Basic Drawing on Images with OpenCV.
How to draw lines, shapes and customize drawings on Images using OpenCV.
Lines, common and custom shapes can be drawn on images using OpenCV drawing functions. Coordinate points and spatial dimensions of images are used to designate positions and dimensions of drawings on images.
Drawing Basic lines
The cv2.line function is used to draw lines on images with OpenCV. It takes integer parameter values of the start and stop coordinates of the line, the line thickness and color to customize the line drawing.
Script: Initialize a black canvas for drawing

Displaying a 500 by 500 Numpy array of Zeros using the np.zeros function initializes a black background image which will serve as a canvas for drawing lines and shapes.
Script: Get the Image Dimensions
The coordinate values of portions in the image and the image dimensions obtained above are useful in drawing on the canvas.
Script: Draw a green diagonal line from the left to the right of the canvas.

The output image has a diagonal line drawn on it as specified by the cv2.line function.
We can make the line thicker by specifying a thickness value in the cv2.line function.
Script: Draw a red, thick diagonal line from right to left of the canvas.

Common shapes can also be drawn on images using specific shape drawing functions in OpenCV.
Drawing Square and Rectangles
Script: Draw a blue square on the image

The image now has the specified square drawn on it using the cv2.rectangle which is a multipurpose function for drawing quadrilaterals (4 sided shapes) on images according to the specified coordinates (shape dimensions).
Shapes filled with colors can also be drawn with the same function by supplying a cv2.filled or -1 values as the thickness parameters.
Script: Drawing a color filled Square

A filled in white square is drawn on the output image.
We can also draw circles on images using the cv2.circle function. The function takes parameter values of the the image, the coordinates for the midpoint of the circle, the radius of the circle, color and thickness.
Drawing shapes: Circles
Script: Draw circles of increasing radii on new canvas

After defining a new (blank) canvas, I drew multiple circles of increasing radii on the canvas using the cv2.circle function, The function takes numerical parameter values of the circle’s midpoint (denoted by centerX, centerY in the above example), the radius of the circle and the color of the circle.
Just as with drawing squares, circles can also be drawn with filled in colors.
Drawing colored shapes
Script: Draw circles of random colors on random points on the canvas.

I drew circles of random radii and colors at random locations on the canvas using the the same cv2.circle function by supplying random values for the position, radius and color for the circles.
Drawing on Images
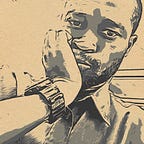
Just as with the blank canvas, drawings can also be done on images using the same functions OpenCV functions. I’ll demonstrate basic drawings on images with a picture of myself.
First, I’ll load the image from disk .

I can then draw circular corners around the image using the cv2.circle function as previously seen.

To draw the circular corners around the image, I initialized a mid point for the circle to be at the center of the image( centerX, centerY) and used a radius which is exactly from the center to the image origin (0, 0). The output shows the image has circular corners as proposed. I would have to reduce the radius of the circle to obtain a full circular edge for the image.
I could also use the same shape drawing functions as seen earlier to draw shapes on of the image. I’ll demonstrate this by drawing filled shapes targeted to cover certain portions of the image such as the eyes and mouth.
Draw circles on the eyes and a rectangle on mouth
To draw shapes at certain portions of an image with OpenCV, it is important to trace the coordinate values that represent the positions where the shapes should be placed in the image. I have previously discussed the he required steps to get values that represent any position in an image here using the Matplotlib library.
Using similar steps from this post, I get that both eyes locations to be around coordinates (192, 167) and (332, 167), while the mouth region is around coordinates (180, 235) (340, 315). I can then use these values to draw shapes at these locations on the image.

Summary: Drawing customized shapes and lines are some of the most basic use of the OpenCV library. I described how to achieve these using the image dimensions, positions for the shapes and customizations such as thickness and color.